Pages

Thursday, March 26, 2015

Our Second Bathroom Reveal... {Basement Bath Reno}

We're ready to reveal to you our new bathroom. 


It's 95% done, and we're so happy with how it came together.


I should mention that we're a whole new family over here. The one bathroom tension has lifted and we're all breathing a little easier. Really, we haven't had any problems since the toilet was installed weeks ago. But I'm glad it caught up aesthetically.

The custom vanity was a great asset to the bathroom. It's made from a bamboo counter top purchased from Lowe's for just over $100. The handyman made two pieces from it plus narrow supports that hide underneath, so that the vanity looks like it's floating (the surfaces were cut just shy of fitting in case the wood expands). We sealed the surfaces with Cabot's gloss spar varnish with marine durability, so we don't need to sweat any water getting into the wood. If you look closely, you can see that we sealed the hair line space between the counter and wall with a clear bead of caulking. On top is the the Cheviot Quattro vessel sink we purchased online from Lowes.

We're digging the oil rubbed bronze faucet from Overstock. It hides everything (every smudge or speck of dirt -- a mama's dream) plus the single hole makes cleaning a breeze. Aesthetically, I love the contrast between the white sink, the faucet's bronze finish, and the bamboo counter top.


The Kichler sconces also came together well. Their 5" extension was just the right amount for a mirror to tuck in behind (and reflect the light back), and they keep the space from feeling crowded.

As far as the vanity's accessories, I'll give a full source list below, but wanted to make note of a few items. I found the storage boxes at Homesense and although they weren't initially what I was going for (I was hoping to find matching baskets) they give ample storage because they extend right to the back with the plumbing falling in between. The mirror is my favorite accessory. It's circular shape breaks up all the hard lines and the etched glass along the outside brings character into a mostly modern bathroom. And thirdly, we went with a standard towel ring from Home Depot for easy use, and it ties in with the finish on the sconces. I picked up two hand towels from Target's closing sale to pull together the bathroom colors. I alternate the towels when one is in the wash.


We're in love with the shower.


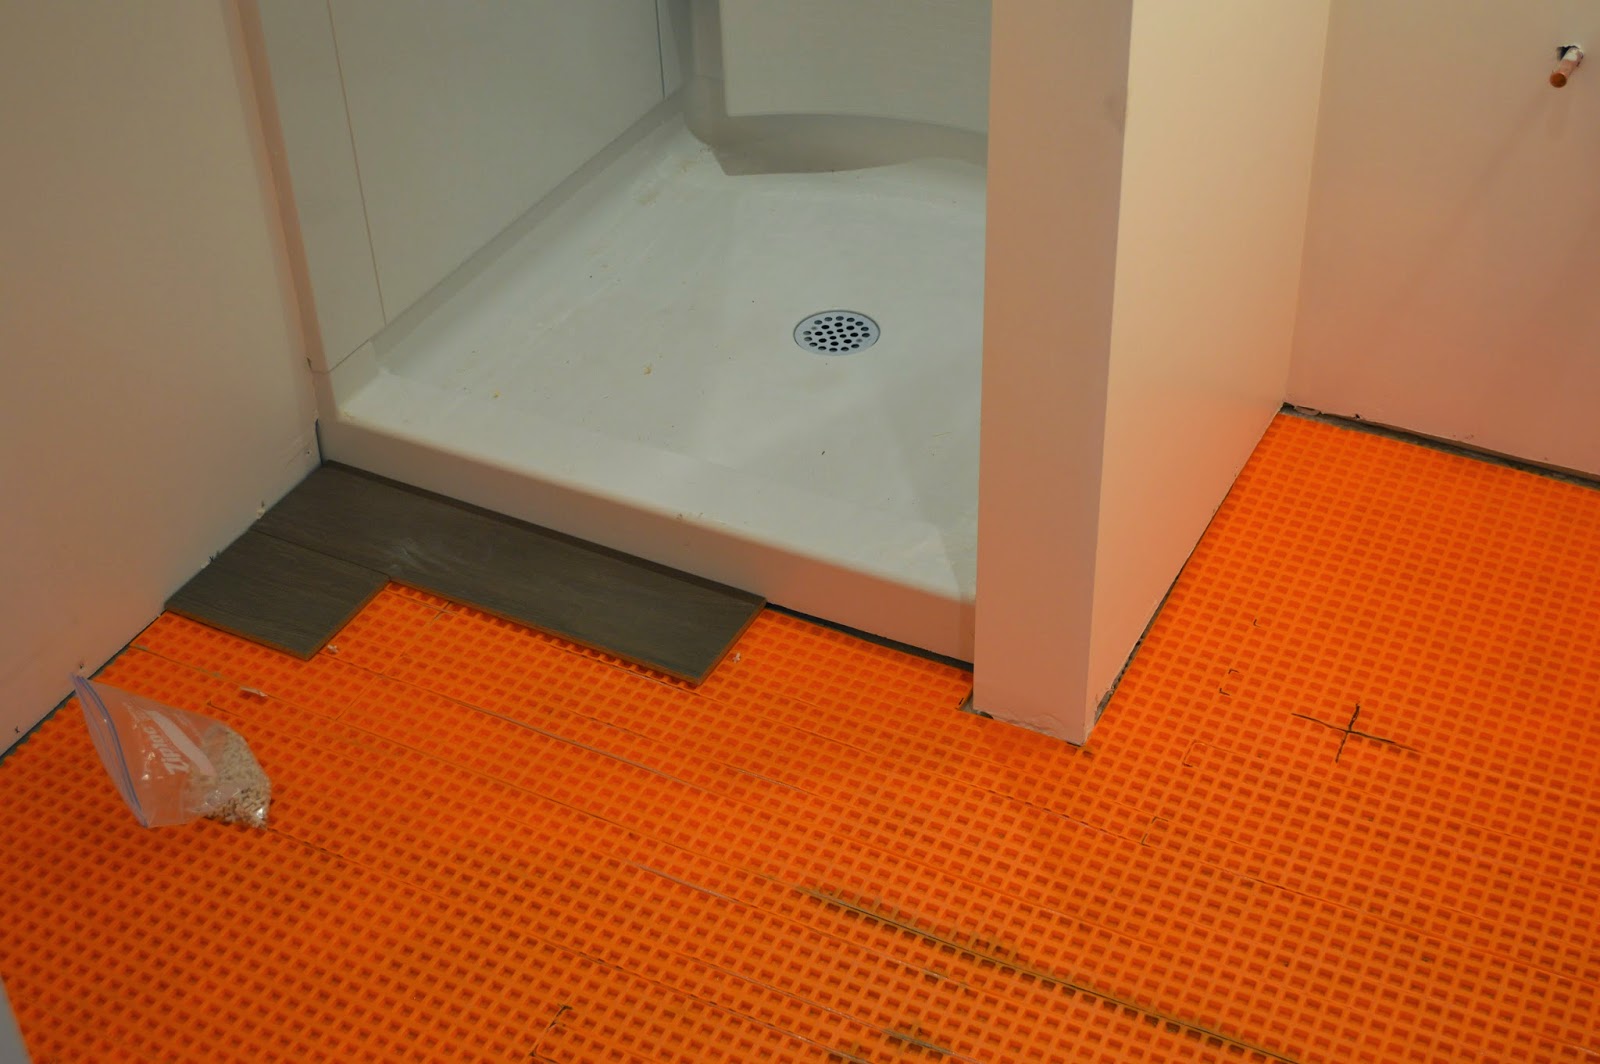
It's spacious, plus we love the generous shower head. The back of the shower curves which is a cool feature and there are little spaces for shampoo, body wash, etc. There wasn't much selection with regards to shower stall curtains, so I ended up with this white curtain with a waffle-like texture from Bed, Bath, and Beyond. It does the trick. We picked up a curtain rod from Home Depot and curtain rings from Target. The rod and rings are hidden behind a little step up in the ceiling.


Next to the shower we went with two hooks, which could easily be added to in the future. But really, only the handyman or I occasionally use this shower. Although, the handyman thinks that towels are too nice and doesn't use them just yet. By the way, stepping out of the shower is amazing because of those warm heated floors. They make all the difference in a cool basement.


These are my first Turkish towels, and now that I've gone Turkish I don't know if I can go back. I love the designs, the fray along the bottom, and how little space they take up when folded. I was giddy when I found this particular design (blue, brown, white) at Homesense, since it ties in the color scheme of the bathroom. Their nice to look at, not like our other towels (but it's not worth replacing our other towels at this point). I bought three at ~$17 each -- the third is in the vanity storage.

We placed one towel hook higher so that it wouldn't interfere with the toilet paper holder. By the way, we ended up purchasing the same swivel toilet paper holder that's in our upstairs bathroom. We didn't notice until we came home, and realized that we must be married to the swivel. I can change my toilet paper in about 2 seconds with 1 hand. Although, I'm not always in favor of matchy-matchy finishes we decided to match the paper holder, towel hooks, and hand towel ring for a semi-seamless look in such a small space.


Here's the third and final corner of our bathroom (not counting the corner where the doors swings in). I went with a shelving unit above the toilet to gain a bit more storage space. But I didn't want to fill it up too much to start. I went with a small holder for Q-tips, a lotion bottle, extra soap, an artificial plant for greenery, and two small books for reading material. Other than the plant, these items came from around our home, keeping in mind the color scheme of the bathroom which are natural tones -- browns, whites, and blues.


I was always appreciate a little bit of art in every space. I picked up this art print and frame from a thrift store for just $5. The wooden frame is in great shape, as well as the glass. I love all the blues, greens and whites, especially the unique blue matting. The flock of birds birds flying above those rolling hills and church brings in some whimsy.


That wraps up our bathroom tour. But just for fun, here's a few more pictures.


It really puts the rest of our basement to shame, although if our basement had a point system (hot or not) it just went up a few points given this new asset. And what did I mean by 95% done? We need to add a stool under the vanity for little legs. I've search high and low at thrift stores but to no avail. We also need to touch up a few spots on the wall that got roughed up along the way. Lastly, I need to go over the grout one more time to truly bring out the charcoal color between the tiles and then seal it up.

But to think it was just a small storage space a few months ago. Amazing. 


By the way, we're still looking to move. Just nothing has come our way that we love yet. But when we move, I wish I could pack up this little bathroom with us. I'd even take it as my ensuite. In fact, it beats any other bathroom we've seen during our house search. It was our first project from scratch and we really enjoyed it... so perhaps I'm also sentimental.

Ok, here's that source list :

Shower stall & accessories - Emco
Toilet - Lowe's
Tile - Lowe's
Heated Flooring Accessories - Sacwal Flooring Center
Door - North Pole Trim
Knob - North Pole Trim
Floating Vanity - DIY, bamboo counter top from Lowe's
Vessel Sink - Lowe's (online)
Faucet - Overstock
Mirror - Homesense
Sconces - Amazon / Living Lighting
Pot Lights (3x) - Rona
Bulbs - Home Depot
Dimmers - Home Depot
Fan - Home Depot
Storage Boxes - Homesense
Hand Towels - Target
Soap Dispenser - Target
Towel Ring - Home Depot
Towels - Homesense
Towel Hooks - Home Depot
Towel Rod - Home Depot
Shower Liner - Home Depot
Shower Curtain - Bed, Bath, and Beyond
Shower Rings - Target
Toilet Paper Holder - Home Depot
Paint - Behr at Home Depot
Shelving Unit - Homesense
Artificial Plant - Homesense
Wooden Trash Can - Target
Art - Yardigans

And if you want to catch up on all the other bathroom posts check out here (the beginning), here, here, here, here (toilet and flooring), and here (sink, faucet, lights & door).


Tuesday, March 24, 2015

My "Oliday" Camera Bag... {Photography}

My new camera bag arrived yesterday.


And I really like it. I ordered the green canvas bag a few weeks ago from a company called Oliday, which I found when browsing Etsy. It's just one of the many ways I'm getting ready for my modest business launch in the spring, since I anticipate taking my camera and lenses on the road more than ever before. What was most important to me was the three interior compartments for my camera and two additional lenses, for the most flexibility in the field. It's a super soft and padded removable insert with a zippered liner for extra protection.


It's compartment heavy on the exterior as well, which is great for all those little things like memory cards, keys, iPad, etc. It has five pockets in all. This way I don't need to bring a purse or fill my pockets will small things. Given all the bags storage capacity it surprised me how small and light weight it is, so hopefully my back won't be aching half way through a shoot. Of course, I can always set it down if I'm in one spot for an extended time. It's got a great little shape to keep it upright.

And of course, I think it's quite handsome. I'm drawn to the earthy color scheme, so it's no surprise that my brand is headed in that direction too.


I'm all kinds of new to the photography field, so I'm attempting to prepare myself as best I can. My list is long. If you're a photographer (or a camera lover), I'd love to know what accessories you use from camera bag, to editing, to taking photos. What lenses do you love? What kind of camera bag do you have? I'm all ears.

By the way, I'm not partnering with Oliday, I'm just sharing a product I've stumbled upon and love.


Thursday, February 26, 2015

We're Moving... {New Site, New Name, New Everything... Almost}

This spring I'll be packing my bags here at This Kind Handyman and I and moving to a new domain. This is a big step for me.


I launched TKH&I in January 2013, and it's a little embarrassing to look back at that first post, where I "timidly joined the masses of bloggers." But I have no regrets. What a gift to go back and see how far we've come. Since pressing publish in 2013, we became parents to two beautiful children through adoption and I've brought readers in on the waves of adoption, parenting, life, and living in a small fixer upper. And it's been pure joy.

I didn't know I would love it like this. The kids know mama likes to "write" and sometimes it feels scary to put myself out there.. but I'm glad to say it never completely stopped me. What comfort I've felt to write, and write, and write.

So thank you for following. It's been humbling to see my readership grow.


Along the way, I bought a Nikon 3200, nothing fancy, to help share stories from our corner of the planet. I was intrigued by my DSLR so it wasn't long before I was shooting in manual and enjoying the creative element of taking photos. Then to my surprise, a couple close to the handyman and I asked me to do an engagement shoot for them, and I almost fell off my chair. Though I was awkward, and nervous, and completely unsure of what I was doing.. I enjoyed it. I edited photos from home between taking my kids to and from school, homework, meals, and errands.. and it fit my life perfectly.

Months later, a few more photo shoots, and lots of thought, lots and lots of back and forth, I decided to just go for it.. do it.. and launch:

Hudson's Rose

...coming soon in April 2015, with the help of an amazing graphic designer. It will be my small business (portfolio + blog), and I'm complete nerves.


But what I love most is the element of being at home for my kids, flexibility, and a creative outlet that this mama really needs. So I'm starting small, very small, and looking forward to what 2015 holds. So this new site? It will have a gallery of my photography work, my photography services.. and still a blog element (home, parenting, life) because I can't be without my roots. I love that Hudson's Rose, unlike TKH&I, will have more to offer, easier to navigate, and more.. of everything. Thankfully I can still pull over all my material from the last 2+ years to my new site.

My man is not too pleased with my name change, feeling left out and I'm reminding him that he's still my kind handyman, but he's still so excited for his wife.

So maybe it's because spring would be amazing right now (ahem, -20 degree celcius weather) but I just couldn't wait to share this news with you. Building a small business with a new name, logo, stationary, whole new website, and more takes time. I'll be sure to announce here when the official move will be made. And as far as where the name, "Hudson's Rose," comes from, my middle name is Rose, and for some of my childhood resided on a little street called Hudson. So it's very personal, sentimental name for me, and it's growing on me. 


Tuesday, February 24, 2015

The Toilet and Floor... the really, really important stuff {Second Bath}

We were really busy last week. We had "Family Day" last Monday, a statutory holiday observed in some of Canada's provinces (and we're happy to be in one of those provinces!). On Family Day, we took in a London Knights game, our city's hockey team, and even walked away with one of the practice pucks that came over the glass. Our youngest's love of hockey grew three sizes that day...

And, we were busy with wrapping up our second bathroom, other than a few cosmetic things. So a lot has happened since I last "saw" you. We've been using our second bath as if we had it all along, and we're loving it. *Spoiler alert*.. sometimes we just want to sit on our heated floors (yes, we went with heated floors!), and admire the work of the last few months.

But let's rewind and catch you up on a few things.. with hopes to reveal the whole bathroom next week.


We made the big decision to heat our basement bathroom floor. We didn't want to put all this effort into a new bathroom and then complain about cold floors. We could see ourselves using this shower regularly, especially the handyman after a cold day of working outdoors, and so stepping out of the shower should be a cozy, warm prospect. The heated floors also increase the room temperature by a few degrees which is nice. Plus, we thought it would be a great selling feature for future buyers (because that's always on our mind these days).


My handyman-dad installed our heated floors (we went with electrical heating, rather than hot water), and as you can see he used this orange underlay, which is called "ditra xl." It's texture allows you to weave the cables through the underlay. This isn't a thorough explanation of the process, but if there's a request for it, or any questions, I could have this handy-dad give us more details. We choose to heat the small area just outside the shower stall and in front of the vanity because this is the traffic zone, and it saved a few bucks. I can stand comfortably in bare feet and a towel (TMI?) and do my routine, and I love that.


The handyman placed the thermostat above the light switches, out of reach of little hands, and mostly out of sight. I like that it's white and blends in. I should have flipped it open for you to see, but the key pad is very simple and easy to navigate. What's extra nice about the thermostat is that it gives us the time. 


When it came to tile, we went with the same tile in our main floor bath because a. we had some leftover tile, b. the additional boxes we needed were on sale at Lowe's, and c. we just really like the look of it. It's a Nott gray procelain tile by Style Selections and the tile measures 6 x 24. We went with the charcoal grout, which unfortunately turned white on us again. So we're beginning to think it's the brand or type of grout. So far, I've done two grout cleanings with the Sulfamic Acid Cleaner, like we did here when our grout turned white, and it's slowly returning to it's original color. On one hand it was nice that we had this problem before and knew of a solution right away.

Important Note: We didn't turn on the heat until one week after the flooring was done to let it set completely.

For those who are curious about doing a small heated flooring project themselves, it cost us just shy of $500 (we're so grateful that labor was free, thanks dad!). It felt like a big cost in the moment, but it really paid off. Here's the cost breakdown for us (items were purchased from Sacwal Flooring Centre):

- Heating System $185
- Thermostat $147
- Ditra XL $74.25
- Mortar $19.95

+ tax ($55.41) = 481.61

On to potty talk...


We coined the day the toilet was installed as "Toilet Tuesday" and we weren't disappointed. The next morning, sure enough, there was a line up for the toilet and I reminded a little one of our second toilet.. and the clouds lifted (no more bowels in distress!). I completely identify with Dana at House*Tweaking who says it felt like she won the lottery when their second bathroom was done (and they have 3 kids!). We decided to go with a Kohler toilet in white with 1.28 GPF (gallons per flush), and we purchased it from Lowe's.


It's not an elongated bowl or dual flush, which we've grown to like in our main floor bathroom. But since it's a round toilet bowl it saves us a few inches of space between the shower stall and edge of the toilet (it gives us approx. 20" of space). We like that it's space-saving toilet, and that the toilet seat and lid are prevented from slamming.

Having the toilet installed was a huge wave of relief. THIS is why we embarked on this renovation several months ago! We feel like a whole new family over here. 


Thursday, February 12, 2015

The Bathroom Accent Wall... {Second Bath}

The painting of our basement bath is complete, other than touch ups and painting the trim. Here's a reminder of the colors we went with (you can read more about it here):


The "Fresh Popcorn" by Behr went on well. It took two coats on the walls and ceiling, in addition to the Kilz primer, and I'm happy to say it's a white I finally like. I've had many hit and misses with white, which is funny because it's "white" and I can't believe how many variations there are. 


But the color I was most excited about was this baby, Behr's "Starless Night." 


I decided to do a strip of it on the vanity wall, and the little raised ceiling above the vanity. 


I actually lied down on the floor for that second shot. I'm committed... plus, it was a great ab work out. I taped the perimeter with "Scotch Blue Painter's Tape" for multi-surfaces, and I give this tape two thumbs up. We picked it up from Home Depot awhile ago, so it was in my paint bucket. Taping took the longest. I used scissors to cut the tape into straight edges for the corners, and ran my finger along the tape several times to make sure there weren't any bubbles in the adhesion. 

Then came the best part. 


I cut in and rolled, using a small stool to reach the ceiling, and a cloth for any dark blue splatters on my freshly painted white walls. After two coats, over two days, I pulled off the tape and here's how it turned out. 


The color is beautiful. I love the contrast against the white, and how the light bounces off the color, it's dramatic. Plus, the lines are nearly flawless. In the end, I was happy I went with painting the small ceiling as well. It carries your eyes up, and makes the small space feel a bit bigger than it is. Of course, a lot of that paint will get covered up with a vanity and mirror, but I think it will make a great back drop. 

I thought it would be fun to pull together the progression of the vanity space thus far. 


I guess that much hasn't changed.. since the original color of the vanity wall was blue (behind the studs)? Although, I'll go with the new blue any day!


Tuesday, February 10, 2015

Thank You Pinterest for Saving Valentines... {Kiddie Valentines}

Because, if I'm being honest, I'm not so creative when it comes to things like this


I told myself last year that I would be more organized this time, with my oldest now in grade 1 and the youngest in junior kindergarten. Which means we would be required to make double the amount of valentines this year. Last year, my daughter made each of her valentines by hand - bless her heart - and she did a great job, but it took many evenings.. right up until her valentines party at school. So I wanted to do something more efficient but still fun for the kids. And get this, we started and finished the oldest's valentines on a snow day we had last Monday (two weeks prior to when they were due!). 

Here's the ideas we went with that I found via Pinterest (and I'll give you all the sources too).


1. The "Whooo's Crazy About You?" valentine is for my youngest's kindergarten class. It totally fits his personality too because he's a crazy, fun, wild kid. Plus, he loves curly straws aka crazy straws. I grabbed the straws at Walmart ($2 for a pack of 6), and found the free printable at Happiness is Homemade. It prints 4 cards to a page, so I used 7 sheets of white card stock (from Target). We have a laser printer so we can easily print this kind of thing at home. So my youngest will practice writing his name 26 times on the back of those little owl cards (we've got 3 days!). 

2. The "Bee" valentines are great for the teachers. Who wouldn't want a new lip chap in the dead of winter? I found the idea at Jolly Mom, and went with the 3.5 x 5 size so that I could fit 4 to a page, which is all we needed (2 teachers per class). I picked up the Burt's Bees lip chaps at Target (a 3-pack plus 1 more). Then using double sided tape, I taped them to the card. Although, I think I'll get little clear bags to slip them into in case they get bumped around. I like that there's a little spot on the card for the kids to sign their names. 


3. We finished my oldest daughter's valentines, "You Make my Heart Glow," in about 1 hour. We grabbed a pack of 40 glow sticks from Walmart for $5, and printed the little cards on card stock. It printed 6 to a page which was nice. I found this idea at Delia Creates, and she's right, this can be whipped up last minute. My daughter helped cut out the cards, whole punched them herself, then wrote "To : ____" and "From : _____" on the back, and carefully picked out a glow stick for each student. It was nice that she could do most of this independently. 


How cute is she? I hope she'll be my valentine... But whew! I think we're going to make it! We just need to finish up my youngest's valentines, and we'll be good to go for Friday. Thank you to all those creative bloggers for helping this mama out. 

Here's a "what you might need" round up:

- Printer
- Card stock
- Hole punch
- Scissors (in our case, we have a cutter)
- Double sided tape
- Markers / pencil crayons

And depending on what you're using.. in our case:

- Glow Sticks
- Burt's Bee lip chaps
- Curly straws

So I'm already thinking of next year, or  end-of-the-year gifts.. because it sneaks up so fast. What ideas have you thought of, or pinned (if you're like me)?